Steve Johnson Modelmaker
|
Back to
BR Locomotives
|
Class 310/AM10
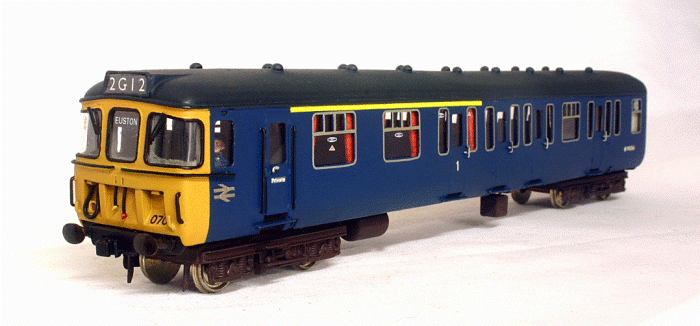
The DTCOL Complete The AM10's were built in 1965-7 to operate on the newly extended electrified southern portion of the West Coast Route between Euston, Northampton and Birmingham. Quite different from earlier EMU's, the AM10's were based on the BR Mk.II bodyshell featuring semi-integral construction. Other features included disc brakes, air cooled rectifiers and wrap round windscreens. The AM10's. now classified as Class 310, underwent refurbishment in the mid-1980's and were fitted with flat windscreens and an additional corridor connection between the MBS and TSO. I have fond memories of these units as I often commuted on them for some fifteen years between Coventry and New Street. Southern Pride offer a kit of this class consisting of resin cast bodyshells, etched brass sides and all the necessary fittings. Although I started this kit many years ago, it has been very slow progress. The first resin bodyshells all warped, sagging in the middle. Fortunately, Southern Pride replaced them free of charge. The bodies are now almost complete and are a running unit being powered by a Black Beetle in the NDMBSO.
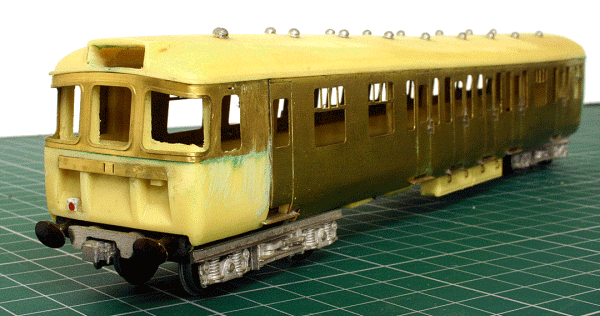
DTSOL initial assembly with chassis Looking a bit rough in this image, one can see how the etched sides and front fit onto the resin shell. I have modified the body slightly to allow working lights in the headcode panel and working tail light.
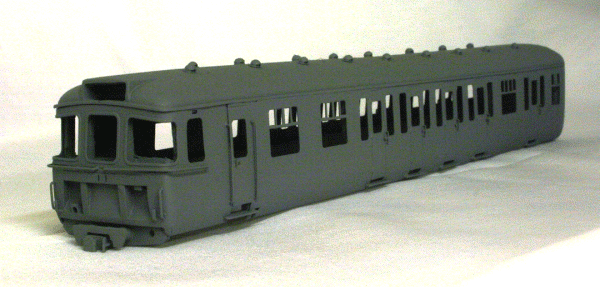
The DTSOL primed and ready for painting As I am modelling the AM10 in original condition, the painting is straightforward. Delivered in Rail Blue, the first few units had a small yellow warning panel, the later ones had the full yellow front and all were repainted as such. I have mainly used Phoenix-Precision paints for the unit, P132 Rail Blue and P131 Roof Grey for the roof. The yellow front end is actually a Halfords Vauxhall Mustard Yellow spray paint. I tend to use this as I find yellow an awful colour to spray and cover nicely. Having painted the unit, transfers and other details were next. The MU jumper cables, receptacle and brake pipes did not seem to be present in the box. Fortunately, I was able to adapt some Shawplan white metal castings. The first item and time consuming, was to fit the aluminium window surrounds that are supplied on a 'sticky label' sheet. All the other transfers were from the Fox range and were F4211 for the car numbers and '1st Class' door, F4267 for the set numbers, F4213/10 for the C1 restriction, FRH4020 for the Overhead Electric Wires warning, FRH4019/6 for the 1st Class yellow cantrail stripe (although this needed trimming down a bit as it was too deep) and F4211X for the 'Private' and 'Guard' markings.
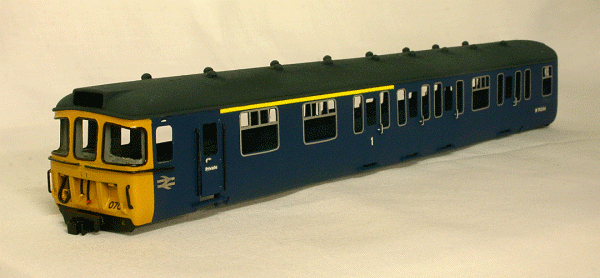
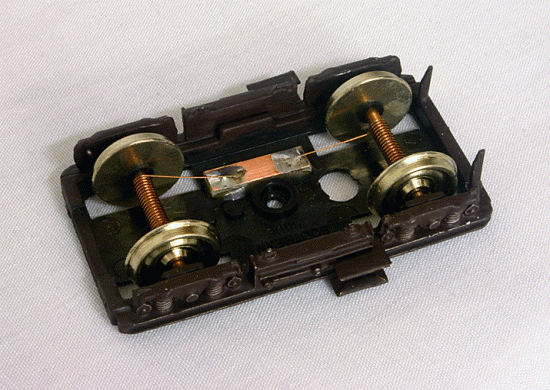
DTCOL painted and transfers applied Perhaps the most difficult thing was how to reproduce the black cab window surrounds. An email to Southern Pride was ignored, but I came up with the idea of using a black Sharpie permanent marker pen. This has worked surprisingly well! Finally, the cast BR Double Arrow logo. These are a Shawplan item, EEA4-1. Varnishing is next. Varnishing, well, what a disaster! I usually use Phoenix-Precision PAV72 Satin varnish for the final coat. In this instance, something went wrong as the cars turned out blotchy and a white chalk like film over them. At this point I would usually strip the paint back to resin and brass and start again. However, the window frames are self adhesive 'sticky labels' and I was very unsure if I could obtain any more. As a 'kill or cure' measure, I decided to try the slightly aggressive Testor's Dullcote. This sometimes adversely affects waterslide transfers, but I figured it might work as they had already been varnished, albeit badly. A quick spray and a wait for it to dry. Success! The Dullcote managed to correct the finish and my models were saved. So a good tip there for the future, before stripping back, try a quick waft of Dullcote. Next is painting the interiors. The cab area is a mid-grey colour and for this, I used Humbrol Acrylic No.1, which is actually a matt grey primer. However, it works well and looks right. The passenger interior is a wood effect finish, for which I used Railmatch 623 LNER Coach Teak. The ceiling is white. Suitable 4 spoke 6mm diameter hand wheels from Markits were used as the handbrake wheels that are quite visible on the second mans side. Glazing was next and I decided to use the supplied clear acrylic strips. The strips were cut and trimmed to fit in the recesses against the back of the etched brass sides. The were fixed with Glue'n'Glaze, which doesn't fog the acrylic like cyanocryalate (superglue) and dries clear. Trying to flush glaze this unit would be very difficult and time consuming! The cab windows are a bit different. I used some Evergreen 0.5mm clear acetate sheet that was cut to size and gently pushed up against the window frames from the inside. As the acetate is very thin, it does bend to follow the wrap round appearance. I'm quite pleased with the result. Fox Transfers 'First' (FRH4019/2) and 'No Smoking' (FRH4019/3) triangles transfers were added to the inside of the glazing. An Overhead Electric Wires warning sticker was also placed in the top left corner of the second mans cab window. MJT etched 'Double Arm' windscreen wipers were painted and fitted to the front. The First Class section of the DTCoL has orange curtains in the window and MJT produce some suitable cast white metal ones. These were painted and fixed in place. Destination blinds are at the top of the centre window in each Driving Car. Examination of photographs revealed that early in the units life, the destinations were in block capitals. Later on, the blinds appear to have been changed to upper and lower case. As mine is modelled in its earlier life, I printed out the destinations in block capitals on my ink jet printer and fixed in position. Work now commenced on the underframes. All had been assembled and fitted with the various bits of equipment. One item that did seem to be missing were the vacuum cylinders under the Driving Cars, despite 'V' hangers being provided. Some Comet cylinders were fitted along with the actuating link. When I started to build this unit, it was not intended to be DCC fitted. As time went on I decided to fit it with DCC and working lights. As a consequence, the wheels I had originally fitted were no longer suitable. So, these were all changed for some DCC Concepts 12mm wheels fitted with their pick up springs. A small strip of copper clad board is fitted to the underside of the bogie and the spring tails soldered to it. Each bogie picks up off the opposite rail on each car. These are supposed to give a reliable low friction pick up and they do work well. Another item missing in the kit are the bogie steps for the driver and guard. Craftsman used to be a good supply of these, but seemed to have ceased trading. Fortunately, Narrow Planet came to the rescue by producing some specially commissioned etched steps for me. Guard irons were also fitted to the outer bogies of the driving cars. For the couplings between cars, I used Kadee couplings with the tails cut off.
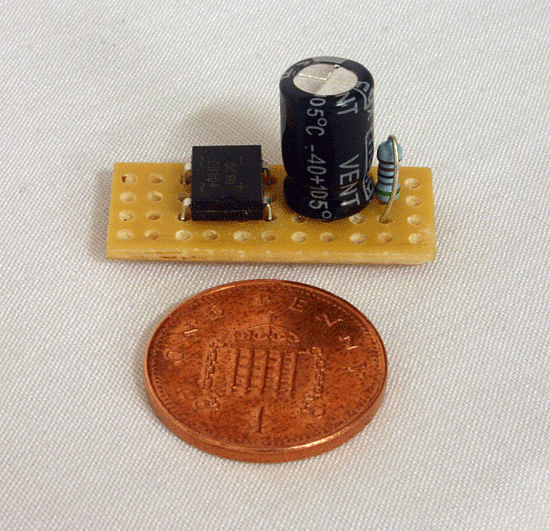
Bogie showing DCC Concepts Pick Up Springs Painting the frames and bogies was next and this may appear a bit contentious. I distinctly remember these units having dark brown underframe and bogies, not black. Certainly Mk.II's and Mk.III's originally had brown underframes. It could have been a build up of brake dust and track dirt, but they definitely looked brown! Unfortunately, Railmatch and Phoenix-Precision seemed to have discontinued this colour, but as luck would have it, Phoenix-Precision had some old stock in their clearance corner. The shade used is P144. Having painted the frames and bogies, they were varnished with Testors Dullcote to match the body. Wires from the bogie pick ups were added and run to the carriage ends were the electrical stuff will be. Back to the interiors. Headcode panels were made using CorelDraw and inkjet printer. These were cut to size and fitted in the apertures. A clear piece of acetate was cut and fitted over the paper to represent glass and finally the painted frame added. Two minute SMD (surface mount device) white LED's were soldered onto a small copper clad board and fixed behind the headcodes. The wires run along the roof to the toilet area of the driving car. The tail light is a small length of red plastic rod long enough to run from the front of the car to the inside, which is actually about 12mm or so through the resin casting. A pre-wired red LED was glued to the back of this and the area painted black to prevent light bleeding through. Again, the wires were taken up to run along the roof. Interior carriage light is provided by cool white LED strips from eBay fixed to the cars ceiling. These 5m rolls are a much cheaper way of buying it than the commercially available items. Wires were soldered onto the terminals and run to the back of the car. Everything was tested, not forgetting the resistor in circuit with the LED's! The four cars have various internal divisions that are visible if the interiors are lit. These were made out of plasticard, fitted and painted. The divisions at the driving car ends have three windows above the seats that allowed passengers to see through the drivers window and the route ahead. In my experience though, the driver often had pulled the blind down and you couldn't see anything! Seating is provided in the kit and is a mixture of two and three seat plastic mouldings. These are intended to be fitted to strips of plasticard 'floor' also provided. I decided to use thgis method as I could sandwich the floor between the underframes and car divisions. For the life of me I cannot see how you can replicate the 2+3 seating arrangement, the cars are simply not wide enough! So all mine is an incorrect 2+2, but at least there is a central gangway. The floor strip was carefully cut to length for each car, leaving a gap under the toilet area for the electrical wiring and gubbins. The seats were glued into the correct positions and painted a Royal Blue colour. The seats were a darkish patterned blue, but this looks close enough. The floor itself is a mid grey. Now to the electrical gubbins. The driving cars have eight wires appearing in the toilet area. This is a good place as you can't see any of it. A TCS FL2 function only decoder powers the directional headcode and tail lights, which takes four wires for the LED's and two for the pick ups. These are programmed to the same DCC code as the Motor Decoder, which in my case is the Class number 310. One driving car has the 'Normal' direction of running reversed in CV29 so that we don't have two illuminated headcodes or tail lights. Both Driving Car decoders were remapped so the lights would function on f0 in line with other stock and not f1 and f2 as supplied. The interior lighting presented a different problem. The FL2 is a two function decoder, so I would either have to buy a more expensive four function decoder for the driving cars and an FL2 for the Trailer Second, or, have the lights on permanently. I chose the cheaper option of having the interior lights on all the time. So, the interior lights could be wired directly to the track pick ups, but we have a problem. On DC operation, they would only be on in one direction only. On DCC operation, they would be on in both directions, but would flicker at half power. So a flicker free DCC circuit was required. A scour of the internet produced a collection of commercially available units and various circuit diagrams. I had a look at the circuit diagrams and found some quite sophisticated circuits that I'm sure are very good. However, I need something very small and adapted a suitable circuit.
Flicker Free Circuit Board The circuit consists of nothing more than a 1A 400V DIL package bridge rectifier, a smallish 330μF electrolytic capacitor and a 5.6k resistor. These are all soldered up on a small piece of stripboard and fitted in the toilet area (DTCoL and DTSoL), carriage floor (TS) and guards compartment (NDMBS). The bridge rectifier passes DC in either direction, but with DCC, it rectifies to full wave. To minimise flicker and smooth out the pulsed DCC output, a capacitor is used. This also stores the electrical energy and will power the lights in the event of a brief interruption in supply. The resistor not only dims the lights to the required level, but also helps with the discharge rate of the capacitor. A larger capacitor will power the lights for longer and the other items in the more sophisticated circuits improve performance. However, the setup I have used works for me and has cost about £0.46 per car (parts from eBay, bridge rectifier 29.8p, capacitor 15.9p, resistor 0.018p). With everything wired up and seating in place, the bodies and chassis were reunited. All that remained were the corridor connections. These are supplied in the kit and are of the thin black card type with 'ears' to prevent locking up on tight bends or reverse curves. One thing to note is that as built, there was no connection between the Guards end of the NDMBSO and the adjacent TSO, although the body mouldings were present. A connection was fitted later on in the 1980's during refurbishment.
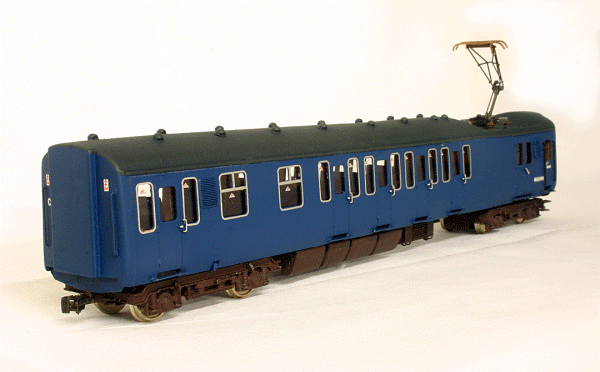
The NDMBSO almost complete. Just needs the corridor connector
|