Steve Johnson Modelmaker
|
Back to
BR Locomotives
|
Class 313
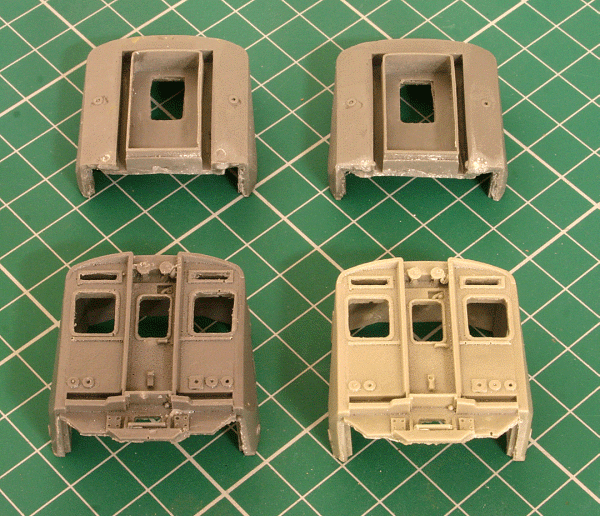
Class 313 DMSO The Class 313's were the first Second Generation EMU's and were the result of extensive tests with the prototype Class 445/6 PEP units. Built in 1976/7, they were destined for use on the Great Northern Inner Suburban routes from Moorgate to Welwyn and Hertford. The section of line from Drayton Park to Moorgate is part of the old Great Northern and City Railway underground line and as such, is electrified at 750v dc third rail. The rest of the route is 25kV ac overhead, resulting in these units being dual voltage. They are also built to a slightly smaller loading gauge, being the same width and length, but having a lower roof line, most noticeable on the Pantograph Trailer Second Open (PTSO) coach less deep pantograph well than usual. As one of my favourite EMU's, I have always wanted a model of one since I first saw them in 1976. Unfortunately, I wasn't aware of any model or kit until recently apart from the MTK version. The first possibility was an Ajay Models kit, but I had heard of some unfavourable reports on quality and it also seemed rather expensive. Fortunately, another supplier has just started to produce the parts necessary to build a Class 313, as well as the 314/315 and 507/508 variants. The image above shows the first parts available. They are CAD designed and 3D Printed then resin cast. To my eyes, they look just right. Sides, roofs, floor and bogies will follow. I bought one of the original production that had separate cabs, roofs, and sides in three sections. The supplier has since altered the items and the bodies now come in two halves (a front and rear to cater for differences in the five classes) that simply fix together with tabs. One note with these models are the roof vents. The early production of Class 313's had large 'box' like vents on the roof. This was later changed to much lower profile vents, as depicted on these models. As such, the models are unsuitable for the first thirty or so. I will add working lights and DCC Control. Other small items will include interiors and non working Tightlock Couplers.
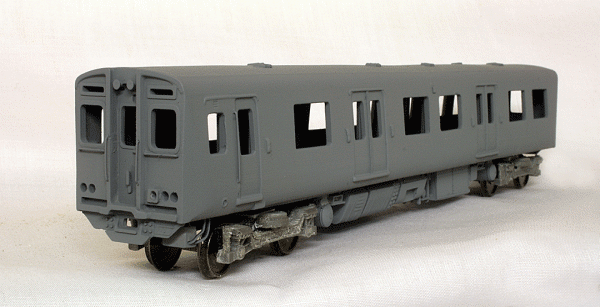
Body parts assembled, underframe needs attention The above photograph shows a DMSO assembled from the nine separate body parts. Unfortunately I had problems with the resin casting on this car on the roof. Some parts of the roof remained 'tacky' and continued to show through the primer. Despite various remedies, I had no option but to purchase a replacement car. By this time, the production method had changed to the two half body version and is actually the car featured in the next photograph. The altered production method certainly makes it quicker to assemble the bodies and produces, what I think, a neater finish. The bogies of these units, and a lot of 'Second Generation' EMU's are quite distinctive. The Class 313 is fitted with the BT13. Fortunately, the supplier had also produced some resin BT13 sideframes. The problem was how to use them. The BT13 is an 'H' frame type bogie and does not have the end transverse members at the end of the bogie. An idea struck me to use some Southern Pride bogies (P146) and glue the sideframes to this. Having done so, then remove the end transverse members. The wheels are 3ft. diameter and so I then needed to source some suitable wheels with one side live and a live axle. This was so that I could use the DCC Concepts pick up springs to supply power for DCC decoders and lighting. Most available wheels seem to insulated on both sides, but DCC Concepts make a pack already fitted with pick up springs. Unfortunately, these were not available anywhere when I came to buy them, so another search found Peter's Spares PS108. These need the springs fitting, but the wheels have already been blackened. These bodies do need a bit of filling and smoothing, time consuming, but worth it. The resin cast floors in particular I found needed a bit of fettling to make them fit under the bodies. The motor car also needs a motor bogie. In this particular instance, I had to hand a spare Hornby Class 153 underframe and bogies. There is a cut out section marked on the pantograph car floor casting and this was easily popped out. I cut off the 'U' shaped mounting frame from the Class 153 underframe and carefully adjusted it to sit on top of the resin floor. Slight adjustments were needed to get the correct ride height. When happy, I glued the Hornby frame to cast floor. As it happens, the Class 153 uses the same bogies and I could have left it at that. However, due to differences in production, they don't quite match the other bogies. So I removed the Hornby frames and substituted the cast ones. The only slight disadvantage here is that the motor and mount are visible through the windows. Class 313's do not have a brake compartment in which to hide the motor. Hopefully it won't be too noticeable being in the centre of the train behind tinted windows.
The Hornby motor bogie and modified PTSO underframe The body castings have moulded cab front handrails and recess by the cab door for the cab handrail. I decided to remove the moulded handrails and add separate wire handrails. Looking at photographs, I noticed that the cab door handrails were proud of the body, so I filled in the recess and added a wire handrail.
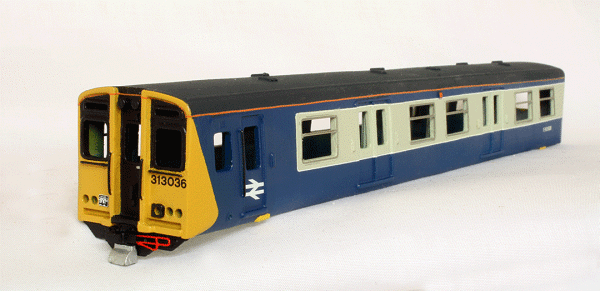
Class 313 in primer ready for painting Couplings were now needed and I used my favoured method of Kadee No.146's with the gearboxes glued into the angled adaptor of the SPM bogies. The pantograph car is slightly different as the Hornby motor bogie already has an NEM coupling pocket provided, so I tried a Kadee No.18. Unfortunately this ended up at a different height to the other couplings, so I have had to use a No.5 fixed rigidly to the NEM arm. As usual, the tails were cut off the couplings. The underframe equipment is also available from the same supplier and a set was duly bought. Unfortunately no instructions were provided, so it was a little difficult to know where to place the various boxes. Photographs proved tricky as I wasn't sure which side of which DMSO I was looking at. Fortunately help was at hand from the very knowledgeable members of RMWeb. Particular thanks go to Danny (pdanny, well worth looking at his threads) who has helped a lot with some of the detail. Some of the supplied items are superfluous and a couple are not supplied, such as the 3rd rail fuse boxes, drum switch under the cab and Motor Generator. The fuse boxes are MJT, the Motor Generator is Southern Pride whereas I made the drum switches. Of particular note are the compressors and main transformer, a lovely bit of 3D printing! With the bodies complete and primed, it's time for a bit of painting. I decided that I would paint the unit in the original BR Blue/Grey livery. Gloss Precision paints are used throughout as this aids with the transfers adhering.
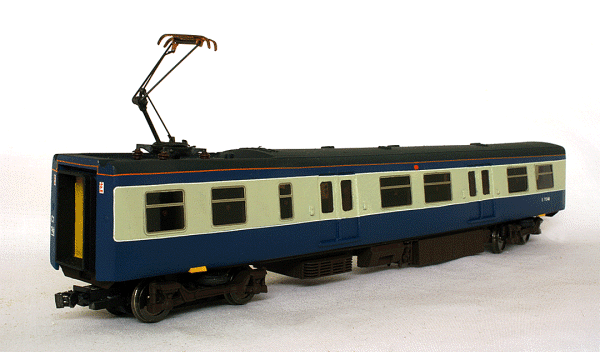
Painted body complete With the body painted, it was now time to add the etched window frames and transfers. The supplier also produces a fret of etched nickel silver window frames for these units. I decided to fit these after painting as the outside of the frames are Rail Grey, but the raised frame is left as the metal colour. The frames were carefully cut out and fixed to the bodysides using Glue'n'Glaze. When done, the outside of the frames were carefully painted Rail Grey. The inside of the frames are slightly smaller than the window aperture, allowing the glazing to butt right up to the frame giving a flush glazed appearance. There are no frames on the drivers side window or doors. Fox Transfers were used throughout. It is very fiddly trying to get the white stripes between the blue and grey and the orange cantrail straight! I've got them as best as I could! You will notice a Tightlock coupler fitted to the front. These took a bit of finding, but I eventually sourced some from a supplier. With the body painted and varnished, it's time to start with the glazing. 313's had brown tinted windows and I was fortunate to find some brown overhead projector acetate for sale on eBay. I chanced buying some and it seemed just the job. I thought it was a little cloudy looking until I realised the manufacturers have covered both sides with a plastic film! Once this was removed, it's perfect. The cabs windows are clear acetate. The round 'No Smoking' symbols were from Railtec Transfers. Unlike some other manufacturers, these are printed in reverse and are designed to adhere to the inside of the glazing. Back on to the underframes and bogies. When built, the Class 313's only had 3rd rail pick up shoes on the inner bogies of each driving car. This was changed when they went to the Southern Region to stop them from being 'gapped'. In addition, as they were working over Underground lines, the had trip cock apparatus fitted on the right hand side of each leading bogie. Again this was removed when they went south.
Class 313 DMSO Complete With everything painted and glazed, it was time to fit the interior. I made up the interior by cutting strips of plasticard for the floors. Fitted on this were the seats, which were some cut down Southern Pride coach seats. The seating is mainly 2+3 except by the vestibules which is 2+2. The floor was painted light grey and the seats blue. Grab rails were made from some Slaters plastic rod, fitted to the ends of the 3 seat units. These were painted yellow. The vestibule dividers were fashioned from plasticard and painted yellow. These seating units simply fit between the body and the chassis. They are 'trapped' inside and cannot move. Interior lighting was fitted in the form of a cool white self adhesive LED strip stuck to the roof. These are powered off my own 'flicker free' pcb board and work on both analogue and DCC. The pick ups, as already described, are from half insulated wheels and DCC Concepts pick up springs. The wiring goes to the 'flicker free' lighting board, then by fine wires running on the ceiling to the front of the car to power the DCC decoder. For the DMSO and BDMSO I used some LaisDCC function only decoders. These were wired to the three white LED's and two red tail light LED's. The decoders are quite small and are hidden in the driving area. With all this done, the carriage is assembled and tested. The PTSO was a similar exercise, but in this case also houses the motor. A Digitrax DH126D decoder was used to control the motor, with power taken off for the lighting board.
Class 313 PTSO Complete The whole unit was then placed on the test track for decoder programming. In the case of multiple units, I tend to use the class number as the decoder address. So in this case, all three decoders had to be reprogrammed to 313. The BDMSO also had to have its direction changed so that the unit would correctly display white lights at the front and red at the rear. As supplied, the Digitrax decoders are not set to anything, so an adjustment to the acceleration and deceleration rates needed to be made for more realistic running. It's taken quite a while to build this unit, but I am pleased to have finally completed it and I am quite pleased with the result. Just wait and see how it is before someone announces an RTR version!
Previous kits of this class include MTK, No Nonsense and Ajay Models.
|