| Back to British Rail Home |
Hudson-Hunslet 24hp Light Diesel Numerous Hudson-Hunslet 24hp Light Diesels found use on Britain's industrial narrow gauge systems. This model by Narrow Planet represents one of the cabless versions, but a cab is available for the kit.
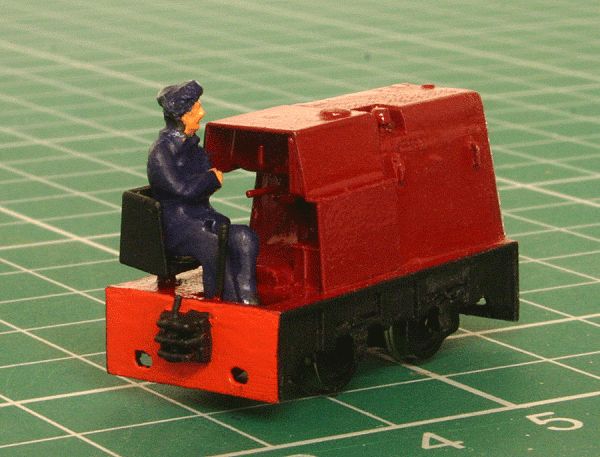
The completed locomotive
A short video showing the Hudson-Hunslet pulling twelve skips on my test track
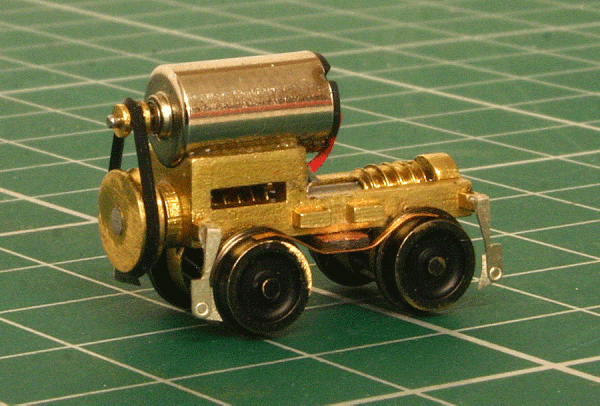
Hudson-Hunslet Parts The kit is a 'multi-media' kit consisting of etched, cast and 3D printed parts in both plastic and brass for the chassis. It is a very small loco and will be a bit of a challenge to build and get to run smoothly.
The completed and running chassis Above is a picture of the completed and running chassis, complete with brake shoes, which are a bit fragile. The phosphor bronze pick up wire included in the kit was a bit fine and I found it difficult to get it to make a good contact with the wheel treads. My bits box contained some 1mm phosphor bronze strip from Albion Alloys. This is my standard pick up strip for the standard gauge 4mm models. However, it was a bit wide, so I carefully cut it in half to produce a 0.5mm wide strip. This was then fixed and the tension adjusted. I have found this a better solution. I will paint the chassis when the body is completed and ready for final assembly. Next job to do is weight the body to make it as heavy as possible without fouling the mechanism. This was done by adding some fine lead shot under the bonnet top as recommended in the instructions. Now the bonnet sides and rear cowling were added along with some detail features like filler caps, bonnet door catches and operating levers in the cab area. The front grille has been deliberately left off. The reason, as the instructions state, it that it will be impossible to paint behind the grille if it is fixed in position at this stage.
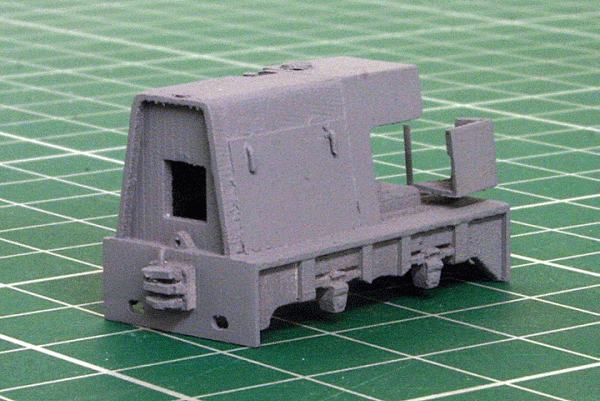
I then cleaned and primed the body. Now this is where priming in mid grey comes in useful as it reveals any imperfections one might not have noticed. In this case, it revealed vertical print lines on the beams and drivers seat back. I had not noticed these before. Easily rectified, the offending sections were rubbed down and another coat of primer shows a smooth finish. Next is to give the loco the final coat of paint, paint behind the grille black before fixing the grille in position. Looking through my 'paint collection' revealed a nice maroon shade (Humbrol No.20) and would make the locomotive look a little different to my various shades of green ones. The grille was painted silver with the underframes, seat and buffing blocks black. The beams are red. The grille was attached using some Glue'n'Glaze, which I find useful for this sort of fixing as it dries invisible and doesn't mark the paintwork like other adhesives. This just left the driver to paint. It is important to use the cast driver as he does add some useful weight at the rear in this very light locomotive.
Body and chassis united for final testing. I usually varnish the finished bodies, but I am quite liking the gloss bonnet and matt other areas, so may just leave it as it is. All in all, a well thought out kit using a variety of materials to their best that went together easily to produce a useful and diminutive locomotive.
|