Steve Johnson Modelmaker
|
Back to BR Locomotives
|
LMS
12003-12022 0-6-0DE
12021 Front View Complete These shunters were a development of the 1934 built 7069-7079 type, but used a single frame mounted motor and jackshaft drive requiring a increase in body length. Built between 1939 and 1942 at Derby Works they used an English Electric 6K 350hp diesel engine and electrical parts. They were numbered by the LMS as 7080-7099 of Lot Number 141. A second batch, numbered 7100-7119 of Lot 156 was built with detail differences. These are covered in the 12023-12032 section. Upon nationalisation they became British Railways 12003-12022 of Class D3/7. They were all withdrawn by 1967 before TOPS classes and numbers were allocated. My take on this shunter is the Judith Edge etched brass kit. I had already built the later 12023-12032 type. The kit follows the usual Judith Edge system of a frame, footplate and body sub assemblies that are all bolted together.
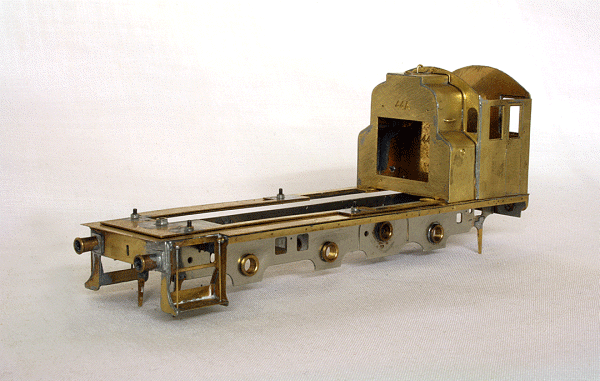
Frames, Footplate, Cab and Fuel Tanks Assembled Construction has continued, albeit slowly over the last few months. No major issues with the build other than lack of time. However, the body is now almost complete, as can been seen by the image below. There are a few other minor body details to add, such as cab steps, lamp irons etc. The cab roof, although rolled, is just sitting on the cab for now and not soldered to it.
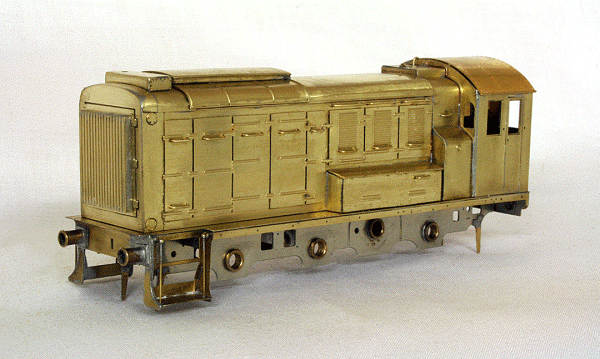
Body almost complete, minor details to be added These few body details shouldn't take long and attention will once again turn to the chassis. There is plenty of space in the body, so I shall use a Mashima 1024 or equivalent (depending on what I can find) coupled to a High Level Loadhauler gearbox with an 80:1 ratio. The wheels will probably be the recommended Gibson 4851N. The reason for this is when freshly overhauled, the wheels had bright rims and axles. As fitted, this is how the Gibson wheels look.
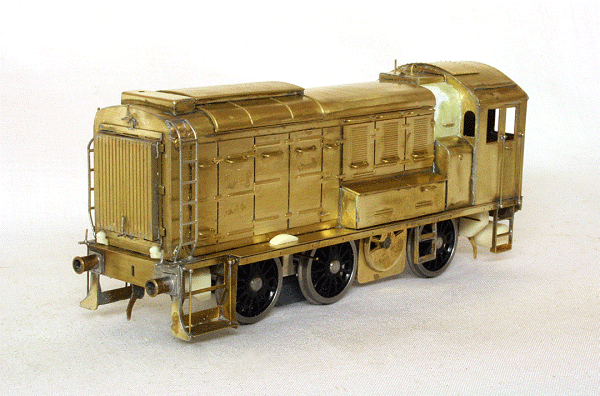
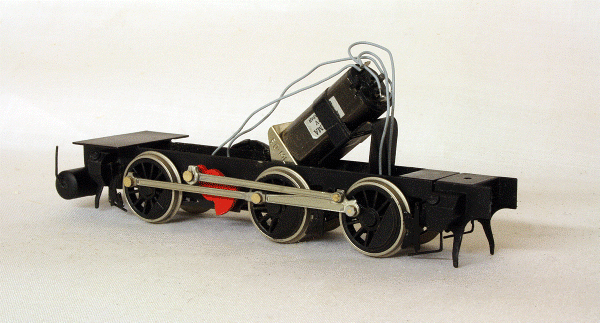
Body Complete awaiting primer With the body just about complete and awaiting primer, I noticed a major error in construction! The area affected can be seen where the filler is. Basically, when I fabricated the fuel tank section, I didn't roll it correctly at the front end. As such, it didn't match the profile of the engine casing. I couldn't easily remove the fuel tank and correct it. So, I decided to use some filler to try and correct the profile, as can be seen. I won't know if this has worked 100% until I prime it. It just shows that mistakes can be easily made and be difficult to correct. Attention returned to the chassis to produce a running unit. Problems were soon encountered with the Gibson wheels. Try as I might, I cannot seem to get get Gibson wheels to run true! The chassis wobbled all over the place! The problem gets worse when you take the wheels off one side to remove the axle to paint the chassis and then refit them. In the end, I gave up and bought some Scalelink wheels. Maybe not quite the correct type, but at least I can get them to run properly. With High Level Kits still not trading at present, I had to resort to defferent motorising options. In the event, I found a spare Mashima 1025 motor and ordered a Branchlines 50:1 Multibox. These were fitted to the chassis without problem. The connecting and coupling rods of this jackshaft drive locomotive are in two pieces, with a rivet joining the connecting rod to the coupling rod. I have had difficulty in the past with rivets, so decided to try something else. In this instance, I used a 14BA brass cheesehead screw. The head end was passed through the connecting rod, then the coupling rod. The thread end was then soldered to the back of the coupling rod and filed down flush. The screw head was also filed down to remove the slot. Far easier and produces a nice tight but free moving joint.
Completed Chassis Now, as I had changed the wheels, I had another problem. The crank throw of the Gibson wheels is different to the Scalelink wheels. This meant there was a slight amount of binding between the connecting rod and gearbox/balance weight. This was cured by making slightly overly large holes in the connecting rod. Not ideal, but it works. The body and footplate were then primed, but a little extra remedial work had to be done to the body. The body was then painted gloss black and numbered as British Railways 12021 along with the 'cycling lion' crest. The footplate was also painted gloss black with red beams. With the two re-assembled, they got a coat of satin varnish. The cab interior was painted cream and the control desk fitted and windows glazed. A small pre-wired white nano LED was fixed to the roof as a cab light. The body was filled with sections of lead sheet until sufficient weight was gained. Sprung buffers and Exactoscale couplings were fitted. After a period of test running on analogue dc, the chassis was fitted with a Digitrax DN136PS decoder. The cab light was also wired to the decoder via a resistor and in common with my other loco's, is controlled by F1.
12021 Rear View Complete Despite two major problems, one with the body requiring filling and the wheels, which were replaced, I am reasonably pleased with the model. Certainly looks the part and is something different with the jackshaft drive.
|


