Steve Johnson Modelmaker
|
Back to BR Locomotives
|
North
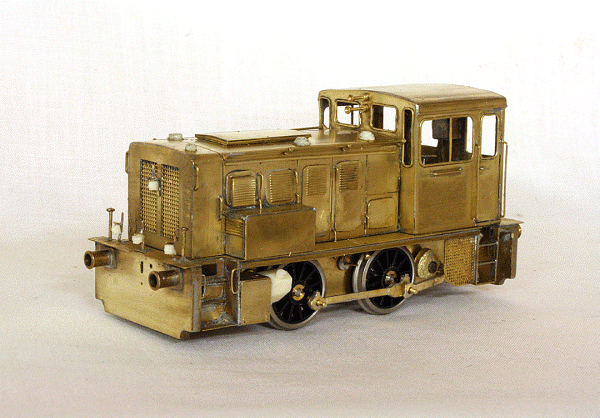
British D2720-D2744 0-4-0DH Built by the North British Locomotive Company over a period from 1957 to 1961, these 0-4-0 diesel-hydraulic locomotives were powered by MAN engines with Voith transmissions. There were a few varieties within the batch and kits offered by Judith Edge Kits cover these differences. The second batch D2720-D2744 (they carried these numbers from introduction) had larger 3ft. 9in diameter wheels and were consequently slightly taller than the original batch. They were all withdrawn by 1968 and did not receive a TOPS classification. Non survived into preservation. Judith Edge Kits offer an etched brass kit of this variant and it is this kit I have used for my model. The kit follows Michaels usual construction method of separate frames, footplate and body which are screwed and bolted together. I started on the frames first, assembling them with the aid of my chassis jig to try and keep things square. Quite important for a four wheeled non-compensated chassis!
Assembled locomotive Having taken a photograph, a few minor details showed up that needed attention. Apart from a wonky lamp iron, the cab window has been squashed somehow. In the above picture, the chassis is fitted with Scalelink 15mm wheels. These were fine, until I tried to fit the jackshaft and jack crank. It then became obvious that the Scalelink wheels had a different crank throw to the Romford or Gibson wheels recommended in the kit. So, nothing for it than to order a set of Romford wheels, which cured the problem. That will teach me! The Romford wheels can be seen fitted on the photograph below ad actually look better inasmuch that they heave fewer spokes.
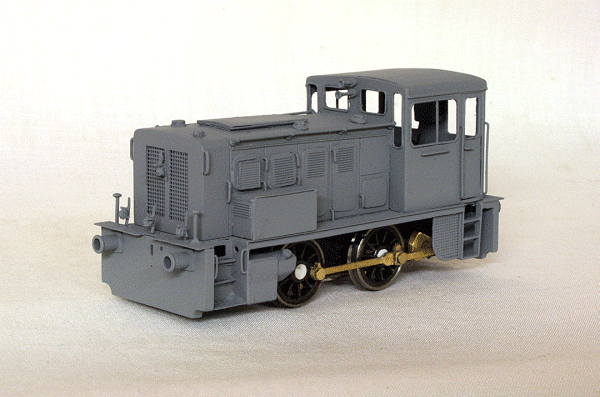
Locomotive in primer with running chassis With the primed body looking good and the chassis running well, there was just one small job to do before applying the top coats of paint. These were the rivet detail on the buffer beams. The kit does have half etches to punch out the detail, but I always seem to end up with a hopelessly curved piece of metal. I have found the Archer rivet transfers a good option and applied these as per the drawing in the instructions and sealed them with a waft of primer. The main body was sprayed with Halfords Rover Brooklands Green, the buffer beams are Volkswagen Mars Red with the cab roof is Halfords Plastic Bumper Grey. The cab interior was painted with Humbrol No.41 Ivory paint.
Completed Chassis The chassis received more attention with the brakes and balance weights added. Small discs of plasticard were punched out using a hole punch to cover the axle nuts. These details were then painted black with the coupling rods, connecting rods and jack cranks painted red. A Mashima 1020 motor fitted to a High Level Kits gearbox was used. The chassis will be fitted with a DCC decoder fitted when the model is completed. With painting complete, it was time to apply the transfers. Not much to apply, just the number and BR totem on the cab side and of course an etched brass North British makers plate. One extra that did need doing was the white edging to the buffer beams and locomotive number to the left of the draw hook at both ends. This seemed to be quite common on Scottish Region shunters. I had deliberately left off the brake hoses to make applying the lining easier. With the lining done, these were fitted. I used Fox Transfers and when finished, applied a coat of Phoenix-Precision satin varnish to finish off. Glazing was applied to the cab windows in the form of acetate sheet cut to size and fixed in position with Glue'n'Glaze. The control desk, painted and detail added, was also fitted in position. As I have spare outputs on the DCC decoders, I light to fit a cab light. This is a small pre-wired warm white SMD LED that is glued to the cab roof. The wires are fed through a hole in the cab front by the control desk that I had already made into the engine casing. I like to fit a cab light as it is a good indication that the locomotive is receiving power correctly.
|